Data feedback plugin
Kibana plugin that offers a Punch Feedback Visualization to annotate Elasticsearch data.
With the Punch Feedback table visualization, you can :
- Give feedback on your data.
- Customize the type of feedback (text, range...).
- Associate a comment to your feedback.
- Save feedback in your data's index or in a new one.
- Decide which aspects of the visualization is customizable.
Installation
The plugin dataFeedback-X.Y.Z.zip is available in the Standalone and in the Deployer.
bash $KIBANA_INSTALL_DIR/bin/kibana-plugin install file:///<path-to-dataFeedback-X.Y.Z.zip>
Configuration
All input are configurable from the Kibana UI. However, If you don't want the visualization to be configured from Kibana, you can specify its settings in Kibana's configuration.
If a setting is specified in kibana.yml, it won't be configurable within the Visualize tab.
Settings that are not specified in kibana.yml are editable within the visualization.
The plugin has the following parameters in $KIBANA_INSTALL_DIR/config/kibana.yml.
# mandatory
data_feedback.tenant: mytenant

# deactivated/commented by default
data_feedback.saveInNewIndex: false
data_feedback.feedbackIndex: "feedbacks"
data_feedback.feedbackType: "text"
data_feedback.select.options: ["green","red","blue"]
data_feedback.range.min: 0
data_feedback.range.max: 10
data_feedback.checkbox.label: "False positive"
data_feedback.maximumNumberOfTags: 1
Usage
Once you've created a new Feedback table visualization and chosen a saved search to get the data from, you can change the settings of the feedback to suit your needs.
Be careful when changing the type of feedback. Changing the input type will delete feedback stored in the table, because they will be overwritten by the default value of the new feedback type.
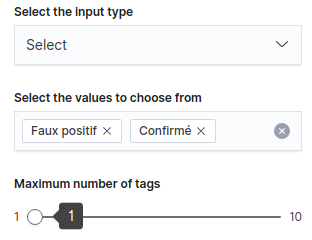
'Select' input type
The select input type lets you enter predefined tags that will be the available options when entering a feedback. You can also set the maximum number of tags to be selected.
For example, if you want a feedback to be either "Faux positif" or "Confirmé", use the following configuration :

'Text' input type
With the text input type, you can add the tags you want, without having to choose between predefined tags. You can also set the maximum number of tags that can be entered.
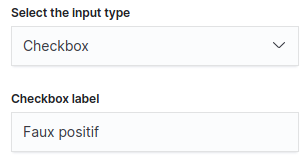
'Checkbox' input type
If you prefer a simple checkbox, choose the checkbox input type and customize its label.
For example, if you want to check the "Faux positif" entries, use the following configuration :

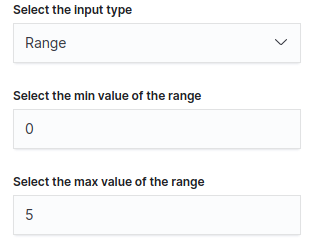
'Range' input type
With the range input type, you can set a minimum and a maximum limit, and choose a value in between.
For example, if you want a feedback between 0 and 5, use the following configuration :

Add a comment to the feedback
When you click on the comment icon at the far end of each table's row, a modal appears and lets you add an optional comment.
Store feedback
Feedback are auto-saved, which means that changing the value of a feedback will automatically persist the new value within an Elastic index. By default, feedback are stored in the same index as the data, but you can change that using the "Create a new index" switch.
Store feedback in the same index
A new entry called feedback will be added to each document displayed in the data table, containing the following information :
{
  "feedback": "<feedback chosen my the user>",
  "comment": "<an optional comment>",
  "inputType": "<select, text, checkbox or range>",
  "platform" : {
    "id": "<ID of your platform>",
    "tenant": "<tenant of your platform>"
  },
  "@timestamp": "<timestamp of the entry>"
}
Store feedback in a new index
The name of the index has to follow the following format : <tenant>-<description>-YYYY.MM.DD. You can only change the <description> part on the configuration panel.
For example, if your tenant is named mytenant, you set the description to feedbacks-imdb and you want to save a feedback on the 20th of April 2020, it will be persisted in an index named mytenant-feedbacks-imdb-2020.04.20
Save multiple feedback

You can save multiple feedback at once by selecting the entries you want with the checkboxes at the far left of the table. A button "Add feedback to X items" will appear ; by clicking on it, you can enter a feedback and comment that will be saved for each selected entry.
You can of course combine this with Kibana filters. If for example, you want to add the same feedback for every document that has a time response greater than 10ms, do the following :
- In the Filter bar, enter a query like the following :
http.response.time_taken>10 - In the table, check the first checkbox, with checks all the rows in the page
- Click the "Add feedback to X items" and save your feedback
Tada, you easily added feedback to a lot of data !
Compatibility
| Plugin version / Punch version | 6.4.1 | 6.4.2 | 6.4.3 | 6.4.4 |
|---|---|---|---|---|
| 2.1.0 | included | yes | yes | yes |
| 2.1.2 | yes | included | included | yes |
| 2.1.3 | yes | yes | yes | included |
Legend
- yes : compatible
- no : not compatible
- included : included in Deployer & Standalone binaries