Open Distro Security For Elasticsearch
Abstract
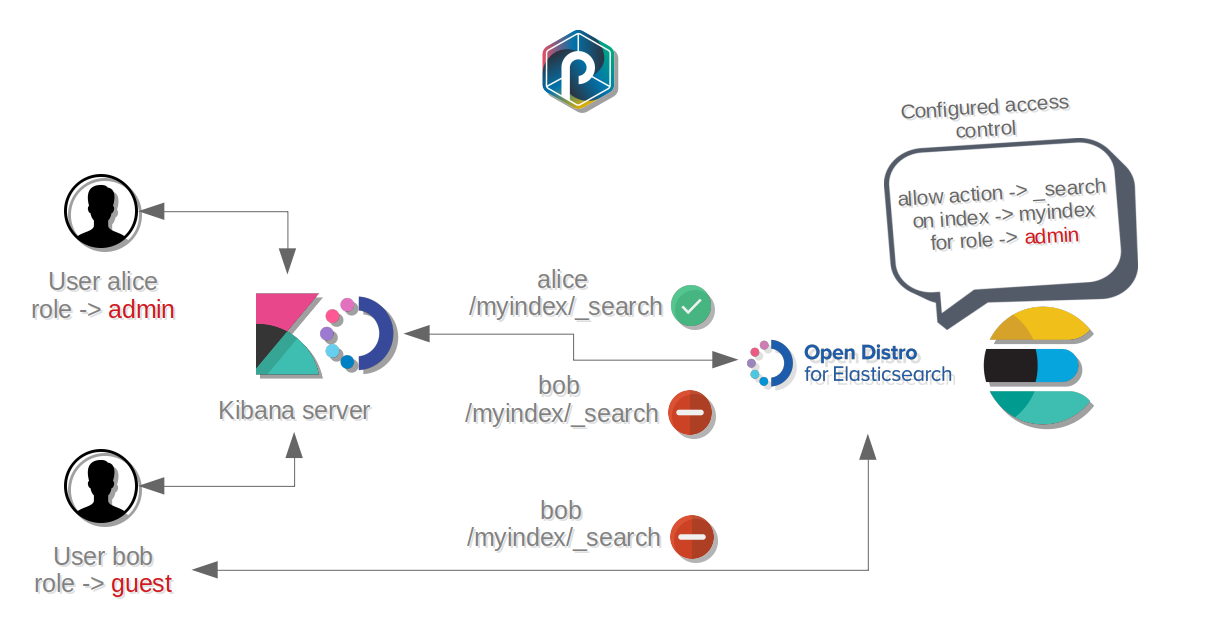
Opendistro Security for Elasticsearch is a plugin from Amazon that allows you to protect your data from users. By defining various fine-grained role-based access control rules with actions on indices, and binding users to roles, your able to provide data to allowed users only.
This plugin also allows you to configure Elasticsearch nodes and Kibana servers with SSL connexions.
The advised integration process is a 3 steps process :
- Step 1: Design and test your Opendistro security backends, using a standalone punchplatform with active opendistro security
- Step 2: Prepare your backend roles / Opendistro roles / Access rights configuration on a pre-production environment
- Step 3: Transport your Opendistro configuration AND roles bindings from your test/integration instance of punchplatform to a deployed Punchplatform
How Does it Work ?
How are permissions granted to users ?
Opendistro Security architecture is compatible with a single Kibana instance for several users :
- Each
useris linked to arole- Each
roleis allowed to processactionsonindices- Each
rolecan be configured to filter queries on documents, but also on fields
Thus, each role has its own level of access to Elasticsearch data.
How does OpendistroSecurity provide to Kibana plugin a tenant-based access control for dashboard's data ?
- Each
rolecan be linked to atenant- Each
tenanthas permissions to read or write permissions on index patterns, visualizations and dashboards- Each
tenantcan be shared between multiple roles- Each
rolesharing a tenant can access to the same dashboards
How does OpenDistroSecurity provide TLS ?
Open Distro Security plugin for Elasticsearch provides two types of TLS overlay :
- Over the node-to-node transport protocol (Mandatory)
- Over the nodes's REST interface (Optional)
Therefore, 3 types of SSL certificates are required for the plugin :
- Admin certificates to push and spread the Open Distro Security configurations in the cluster, using the transport protocol (Mandatory)
- Node certificates for the node-to-node transport protocol (Mandatory)
- Http certificates for the nodes REST interfaces (Optional)
Info
Learn more about these feature by following our Getting Started guide on Opendistro Security
Step 1 : Standalone tests for Open Distro security design
Abstract
The purpose of this section is testing the validity of your Open Distro Security configurations and design, which means : what type of backend I want to manage my acces control over users ?
Start to install a fresh standalone with the security feature :
# in standalone dir
./install.sh --with-opendistro-security

# start up
punchplatform-standalone.sh --start

# check ES cluster security
curl localhost:9200
# >> Unauthorized

curl localhost:9200 -u admin:admin
# >> works !
Edit the Open Distro Security config.yml file to configure the type of backend you want to manage the access rights :
edit <Punchplatform Standalone install dir>/../external/elasticsearch-7.10.2/plugins/opendistro_security/securityconfig/config.yml
You may choose between different types of backend to manage your users and groups :
Internal
It is the default mode for the Punchplatform Standalone. The access control information are stored inside the Elasticsearch indices and local files.
Ldap
Follow Open Distro Security binding with LDAP Punch Guide. Learn how to put an Elasticsearch cluster bound with an LDAP backend for access rights in production, then come back to this documentation for further information.
Others
Learn more on Open Distro Security authorization documentation
Once you edited your config.yml file with the type of backend service you want to manage users and groups, push the
new config.yml in Elasticsearch using securityadmin.sh :
cd $PUNCHPLATFORM_CONF_DIR/../external/elasticsearch-7.10.2/plugins/opendistro_security/tools
sudo chmod +x securityadmin.sh
sudo ./securityadmin.sh -cd ../securityconfig/ -icl -nhnv \
    -cacert ../../../config/punch-ca.pem \
    -cert ../../../config/es-admin-super-1-cert.pem \
    -key ../../../config/es-admin-super-1-key-pkcs8.pem
To test your binding for LDAP and other backends :
Go to Kibana and test the binding with the backend type of your choice by creating the role mapping with a security roles :
- Go to
localhost:5601in your browser- Connect as
admin:admin- Go to
Security(tab inside the left padlock) >Role Mappings- Select
Role>kibana_user- In
Backend role>+Add, write the name of a group of users you have created inside your backend (an LDAP group of users for example). The users of this group will be considered as akibana_userby Open Distro Security (no administration permissions, but they can connect to kibana.).- Click
Submitand logout
Finally, export your Open Distro Security configuration file inside a dedicated directory to be used in an integration environment :
mkdir ~/opendistro_config
cp $PUNCHPLATFORM_CONF_DIR/../external/elasticsearch-7.10.2/plugins/opendistro_security/securityconfig/config.yml ~/opendistro_config
Step 2 : Prepare your integration environment (or yet on standalone)
Abstract
The purpose of this section concerns :
- The deployment the services you need with Open Distro Security
- The import of the Open Distro Security configuration you have made in the previous section
- The test of the binding between your backend and Open Distro Security plugin
- The creation of the users, roles and roles mapping matching the use case you need
- The export the Open Distro Security configurations
Configure Elasticsearch
Requirements :
- SSL certificates for security administration
- SSL certificates for node-to-node transport protocol
Warning
We strongly recommand to generate :
- one certificate per node for SSL transport layer
- one admin certificate per cluster for security configuration management
The node certificates and the admin certificates MUST be different (by their DN configuration). Otherwise, Elasticsearch will not start properly because of Opendistro Security plugin.
Info
Opendistro documentation provides a guide to generate proper certificates for Security plugin here. We strongly recommand to follow their guide to install certificates compatible for production environments
Info
Learn how to configure Elasticsearch with Open Distro Security plugin in
punchplatform-deployment.settings
Configure Kibana
Info
Learn how to configure Kibana with Open Distro Security plugin in punchplatform-deployment.settings.
Install Kibana with the Punchplatform Plugin :
Requirement :
- A Punchplatform Gateway installed in your pre-production environment
Info
Learn how to configure Punchplatform Gateway in punchplatform-deployment.settings.
Warning
If you configured the Punchplatform plugin for Kibana to use TLS connexions, your certificates must respect the following requirements :
- The Gateway certificate must contain :
- Its server hostname as the
CNvalue - The Kibana server's hostname as the
DNSvalue and/or the Kibana server IP as theIPvalue inside theSANentries
- Its server hostname as the
- The Kibana server certificate contains :
- Its hostname as the
CNvalue - The Gateway server's hostname as the
DNSvalue and/or the Gateway server's hostname IP as theIPvalue inside theSANentries
- Its hostname as the
Deploy
First execute this command on your deployer machine :
punchplatform-deployer.sh --generate-inventory
This command generates a complete set of so-called inventories from your two configuration files.
If that succeeds, you can proceed.
From the deployer, make sure you can access your target server using ssh. Depending on your ssh configuration this may require a ssh password. Simply execute the following command :
punchplatform-deployer.sh --deploy -Kk --tags elasticsearch
# Install the Gateway if you plan to install the Punchplatform plugin for Kibana:
punchplatform-deployer.sh --deploy -Kk --tags gateway
punchplatform-deployer.sh --deploy -Kk --tags kibana
Test your deployment configured without SSL :
Elasticsearch should be now protected by an authentication with admin:admin as default credentials :
curl ${es_production_address}:${es_production_port}/_cat/indices -u admin:admin
# >> green open .opendistro_security         qP3mkA9ZS_uzk3EPt5hqkg 1 0 6 0 25.3kb 25.3kb
Test your deployment configure with SSL :
If you enabled the SSL over the Elasticsearch's production interface :
# without any certificates authentication
curl https://${es_production_adress}:${es_production_port}/_cat/indices -u admin:admin -k
# >> green open .opendistro_security         qP3mkA9ZS_uzk3EPt5hqkg 1 0 6 0 25.3kb 25.3kb
# with ES cluster's certificates authentication
curl https://${es_production_adress}:${es_production_port}/_cat/indices \
    -u admin:admin \
    --cacert ${client_ca_file}
# >> green open .opendistro_security         qP3mkA9ZS_uzk3EPt5hqkg 1 0 6 0 25.3kb 25.3kb
Test your deployment configured with the Gateway for the Punch Plugin :
If you installed the Punchplatform Gateway, the test remains nearly the same :
# without ssl
curl ${gateway_address}:${gateway_port}/v1/mytenant/es/${es_cluster}_cat/indices -u admin:admin
# >> green open .opendistro_security         qP3mkA9ZS_uzk3EPt5hqkg 1 0 6 0 25.3kb 25.3kb
# with ssl
curl https://${gateway_address}:${gateway_port}/v1/mytenant/es/${es_cluster}_cat/indices \
    -u admin:admin \
    --cacert ${client_ca}
# >> green open .opendistro_security         qP3mkA9ZS_uzk3EPt5hqkg 1 0 6 0 25.3kb 25.3kb
Finally, go to Kibana, log in with admin:admin and check the presence of the Security tab to proceed to the next section.
Import your Open Distro Security configuration
Get the Open Distro Security configuration file you created during the previous section of this documentation, import it to one of your Elasticsearch nodes and finally push it inside your Elasticsearch cluster :
# import the opendistro security configuration to ONE es node. Check 'setups_root' value inside your puncplatform-deployment.settings
scp ~/opendistro_config/config.yml admin@esnode:/${setups_root}/${es_version}/plugins/opendistro_security/securityconfig
# push the Open configuration
ssh admin@esnode
cd /${setups_root}/${es_version}/plugins/opendistro_security/tools
sudo chmod +x securityadmin.sh
sudo ./securityadmin.sh -cd ../securityconfig/ -icl -nhnv \
    -h ${es_node}
    -cacert ../../../config/${admin_ca_file} \
    -cert ../../../config/${admin_cert} \
    -key ../../../config/${admin_key}
Info
The admin_ca_file, admin_cert and admin_key files are mandatory for Open Distro Security configuration management.
You Must provide them inside a folder and set its path inside the local_ssl_certs_dir configuration of each
elasticsearch server :
punchplatform-deployment.settings.
Warning
securityadmin.sh REPLACES any configuration of opendistro roles mapping/ RBAC settings that you may have done using the kibana 'security' plugin. So before launching this command a second time, make sure you have backed up all the changes you did on the integration platform (see 'exporting' below)
Enrich and Export your Open Distro Security configuration
The next step is by far the most important. You have to :
- Create users and groups inside your backend service bound to Open Distro Security. It must concern a restricted data access that you already defined with use cases.
- Create an Open Distro Security role for each user group
- Configure cluster, index and optionally document and field permissions for each Open Distro Security role to match the bound user group
Info
For Internal backend mode, users and roles are made inside the Open Distro Security tab in Kibana
Once you validated that every security role matches your data access use cases, export your Open Distro Security configurations, to be imported in a production environment :
# on es node, export Open Distro Security configurations
mkdir ~/opendistro_backup
cd /${setups_root}/${es_version}/plugins/opendistro_security/tools
sudo ./securityadmin.sh -backup ~/opendistro_backup -icl -nhnv \
    -h ${es_node}
    -cacert ../../../config/${admin_ca_file} \
    -cert ../../../config/${admin_cert} \
    -key ../../../config/${admin_key}
Step 3 : Deploy Opendistro Security for production
Abstract
The purpose of this section concerns :
- The deployment of the services you need alongside Open Distro Security in production, using the configurations made in the previous section
- The import of the Open Distro Security configuration you have made in the previous section
- The modification of the default security informations for the administrator and the kibana server
At this step, we consider you have :
- All configuration files of Open Distro Security plugin exported at the end of the previous step
- Users and groups properly structured inside your backend service in production, if you need to
Deploy
Proceed exactly in the same way as in the previous section, following the Deploy instructions.
Import your Open Distro Security
configuration
Proceed exactly in the same way as in the previous section, following the Import your Open Distro Security
configuration instructions.
Change default configurations
Warning
For production deployement purposes, you must change the default credentials. Follow the next section to properly configure the server protected by the plugin
Connect to the server hosting the Elasticsearch node, and generate a new password for :
- admin user
- kibana server's user
To do that, choose an Elasticsearch node dedicated to security configuration's management and use the security tool to update Opendistro config files
ssh ${admin_user}@${es_node}
cd /data/opt/elasticsearch-7.10.2/plugins/opendistro_security/tools
sudo chmod +x hash.sh
sudo ./hash.sh
> [Password:]
Type the new password for admin user, then copy the hashed result.
Execute the same procedure for kibana server's user.
Update :
/data/opt/elasticsearch-7.10.2/plugins/opendistro_security/securityconfig/internal_users.ymlwith the new password hashes/data/kibana/admin/kibana-7.10.2-linux-x86_64/config/kibana.ymlwith the new Kibana server's password
Finally, to update your changes you can :
- restart Elasticsearch
- execute
securityadmin.shwith admin certificates
To execute securityadmin.sh, run :
cd /data/opt/elasticsearch-7.10.2/plugins/opendistro_security/tools
sudo chmod +x securityadmin.sh
sudo ./securityadmin.sh -cd ../securityconfig/ -icl -nhnv \
    -h ${es_node} \
    -cacert ../../../config/admin-ca.pem \
    -cert ../../../config/admin-cert.pem \
    -key ../../../config/admin-key-pkcs8.pem
Try now to authenticate with your new credentials with curl, or by connecting yourself to Kibana.
Update Open Distro Security certificates
Abstract
The purpose of this section is to learn how to properly update the Open Distro Security certificates for a cluster.
To spread the new Open Distro Security certificates over the cluster, you need to :
- Gather the files inside one dedicated directory on the deployer machine
- Update the following Elasticsearch configurations inside
punchplatform-deployment.settings :
local_ssl_certs_dir: containing the new Open Distro certificatesauthcz_admin_dn: containing the DN value of the new admin certificatesnodes_dn: containing the DN value of the new nodes certificates- All certificate filenames configuration concerned by the update
- Deploy Elasticsearch
How to get the DN value of a certificate ?
openssl x509 -subject -nameopt RFC2253 -noout -in mycert.pem
Add nodes to an existing Elasticsearch cluster with Opendistro Security enabled
This section helps you add nodes to an existing Elasticsearch cluster without breaking a custom Opendistro Security configuration.
If you changed Opendistro Security configuration after first deployment, the new nodes joining the cluster should not initialize the configuration again. In order to use the existing configuration, you must include an existing node along with the new nodes list.
For example, if you have an Elasticsearch cluster on server1, server2 and server3,
and you want to add server4 to this cluster, you must use the following command:
punchplatform-deployer.sh --deploy -t elasticsearch -l server3,server4
Deploy with another user than default admin user
This section helps you create an INITIAL user to deploy Open Distro Security plugin. You can also follow this guide to change
admin:admindefault credentials.
Generate the hash
Before adding your new user within the internal_user.yml file, you need to generate the password hash using Opendistro security tool.
Therefore, you must have an Elasticsearch cluster with Opendistro security available.
On a standalone:
bash $PUNCH_STANDALONE/external/elasticsearch-7.10.2/plugins/opendistro_security/tools/hash.sh
On a deployed worker:
bash /data/opt/elasticsearch-7.10.2/plugins/opendistro_security/tools/hash.sh
The prompt will ask you the password you want to hash.
Add the credentials
After generating your hashed password, go to your internal_users.yml file located in $PUNCH_DEPLOYER/roles/elasticsearch-opendistro-security-plugin/files/securityconfig/.
Add your custom user if you want another admin user:
user:
  hash: <YourGeneratedHash>
  description: "This is a custom user"
  backend_roles:
    - "admin"
Warning
The custom user must have the admin backend role or similar rights.
Then, you have to add your credentials (username and non-hashed password) within the punchplatform-deployment.settings,
under the section elasticsearch.clusters.<cluster>.plugins.opendistro_security:
{
  "elasticsearch_username":"user",
  "elasticsearch_password":"password"
}